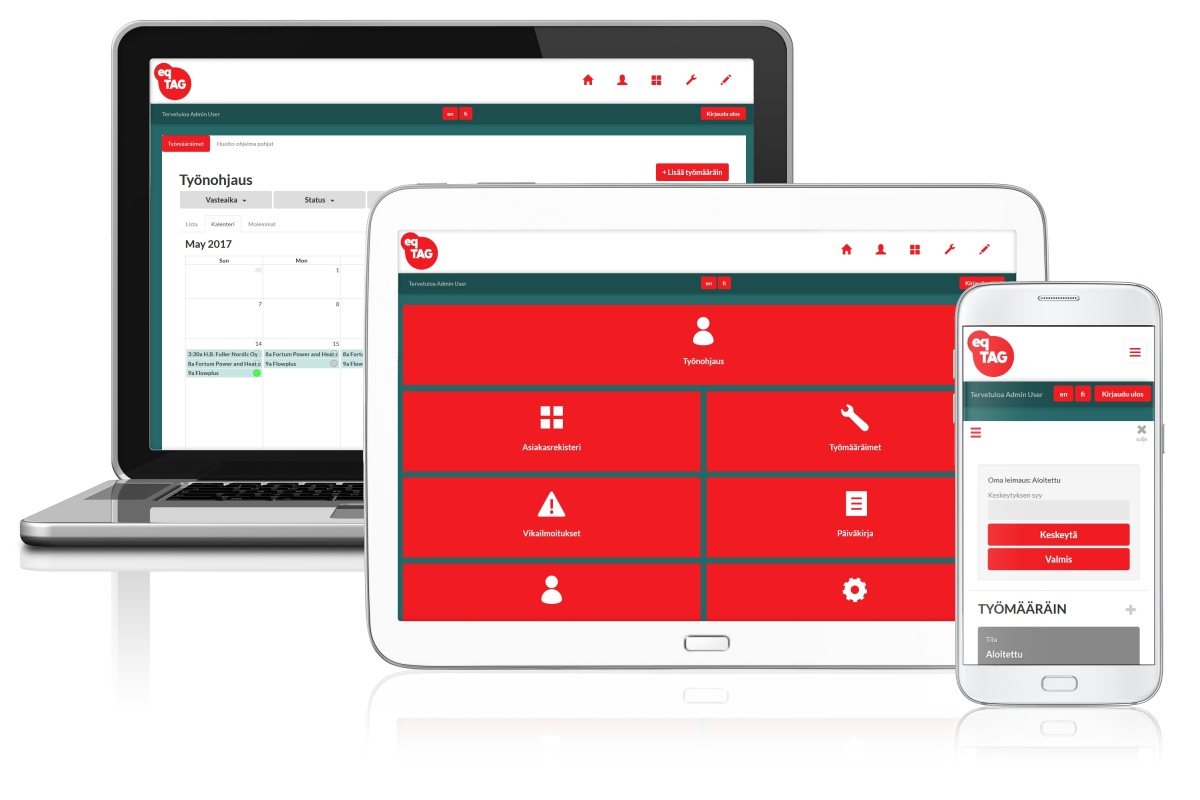
eqTAG – Product Guide & Tutorials
Find everything you need to know to get started ! From how to use, to customizing your system settings to meet your specific requirements. All our tutorials are available within the system and are accessible with the touch of a button.
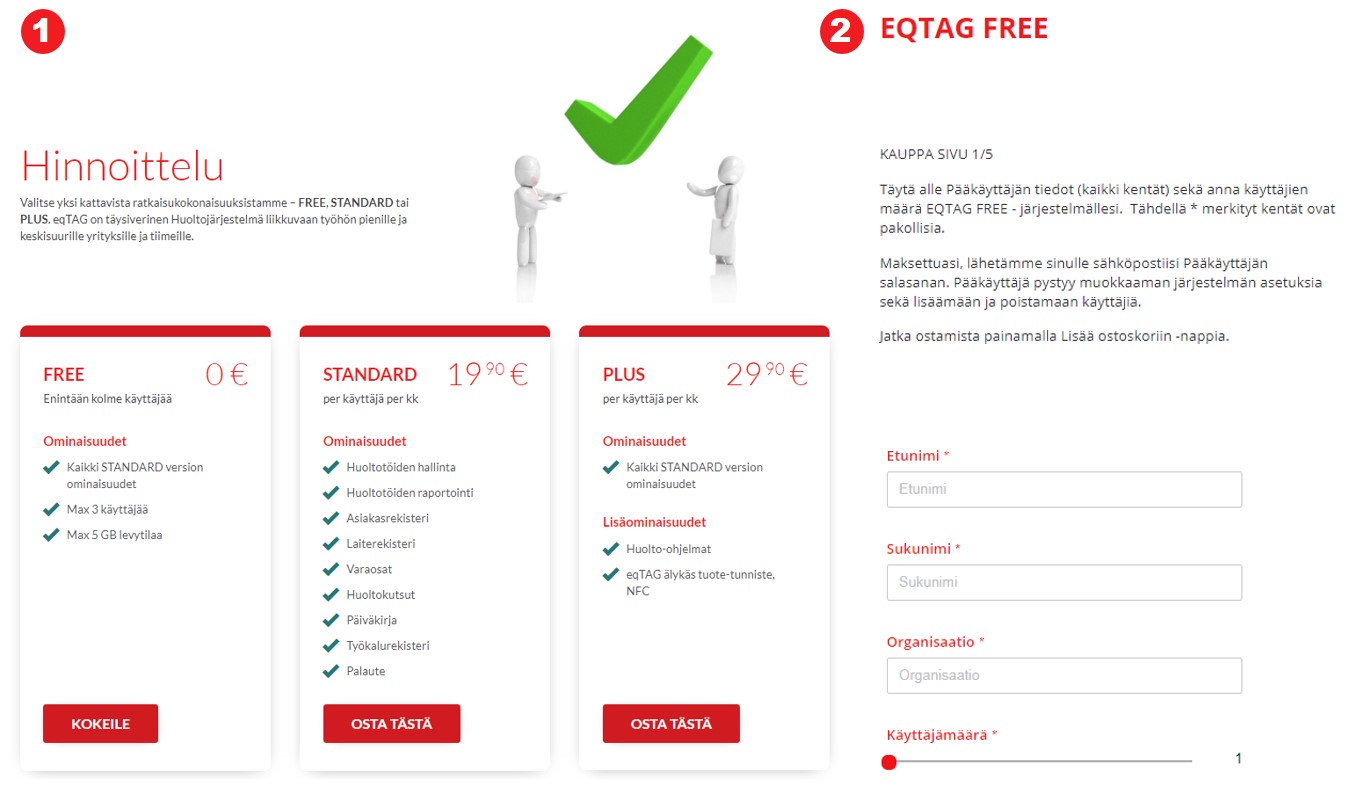
Buying
Pick your plan and start using
eqTAG Field Service System is available via https://www.eqtag.com/pricing
- Pick your product plan and eqTAG guides you through the process.
- Enter the information for your account. First Name, Last Name, Company and Number of users. Review your order, select your payment method and your order will be ready.
Your service is activated immediately after payment. Order confirmation and credentials will be sent to your email. Use your credentials to login to the service from our front web page or via site address: https://go.eqtag.com
TRY NOW >PRICING
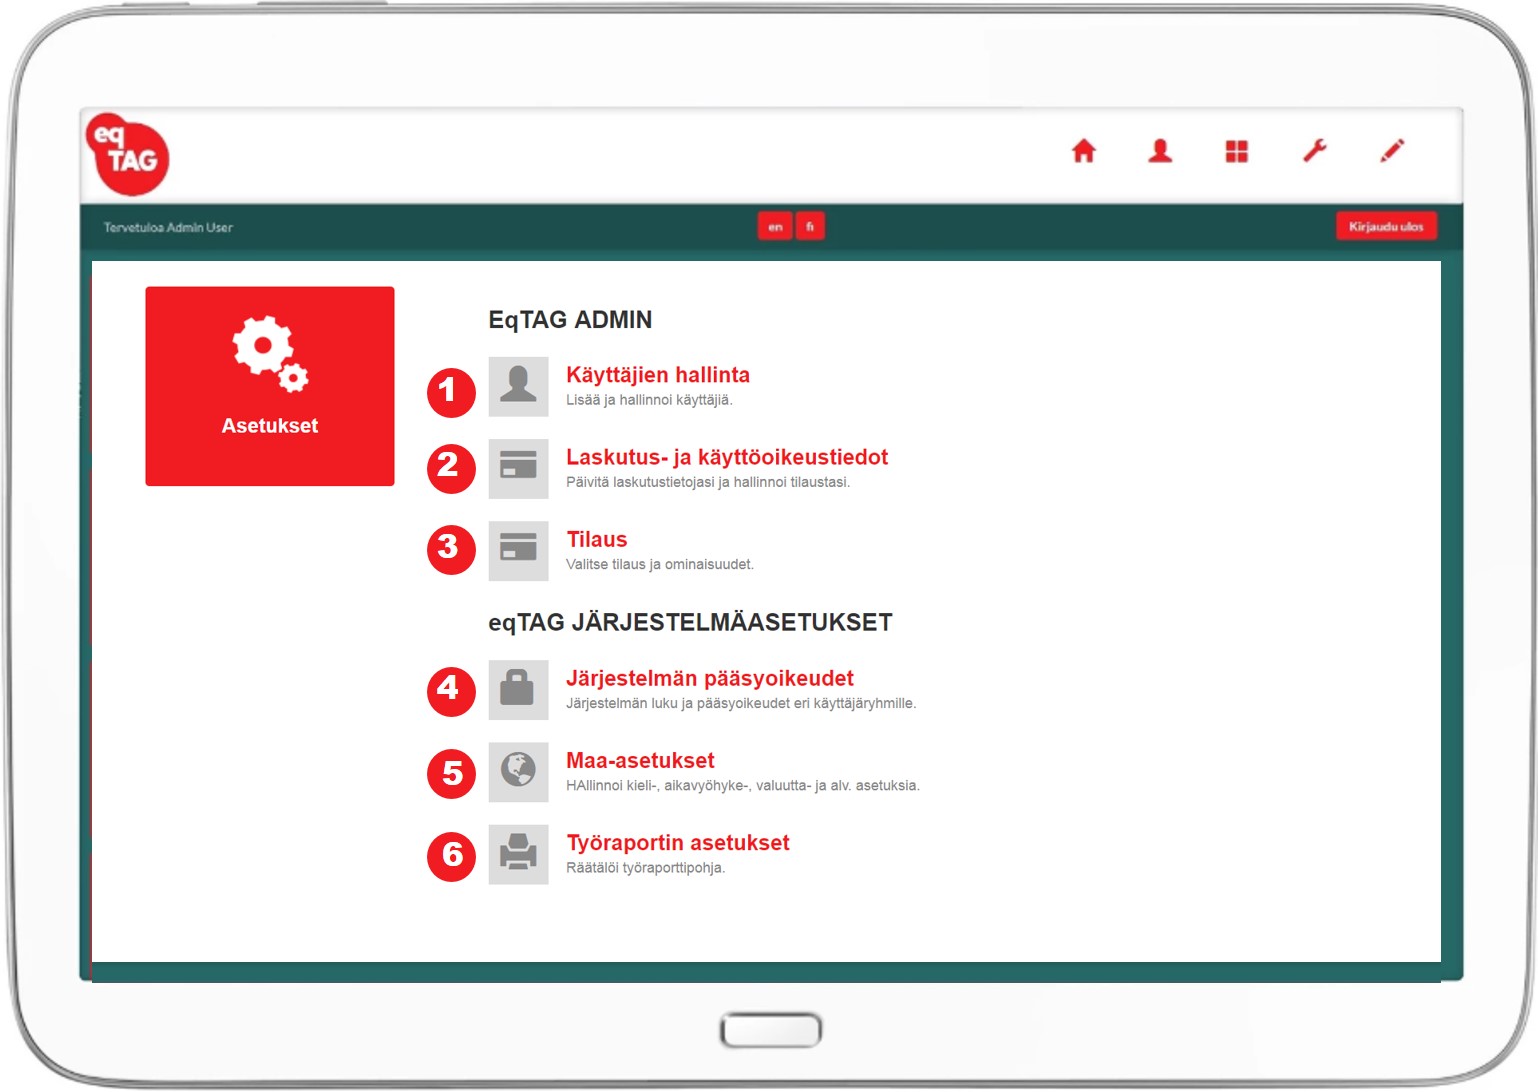
Getting started – System settings
Changing the default settings
eqTAG settings are managed in the system’s settings module. eqTAG Field Service system is delivered to you with the default settings. At the first login, please adjust the settings to fit your local and organisational needs. Especially remember to change your country settings: Time zone, Currency and Language.
- User management Add and manage users.
- Billing details and licenses Update your billing details and manage your subscription.
- Plan Select your payment plan and features.
- System acces and user rights Manage your general configuration and user rights.
- Country settings Manage your language, Time zone, Currency and VAT.
- Service report template Configurate your service report template.
Work management
Create, schedule and assign service orders
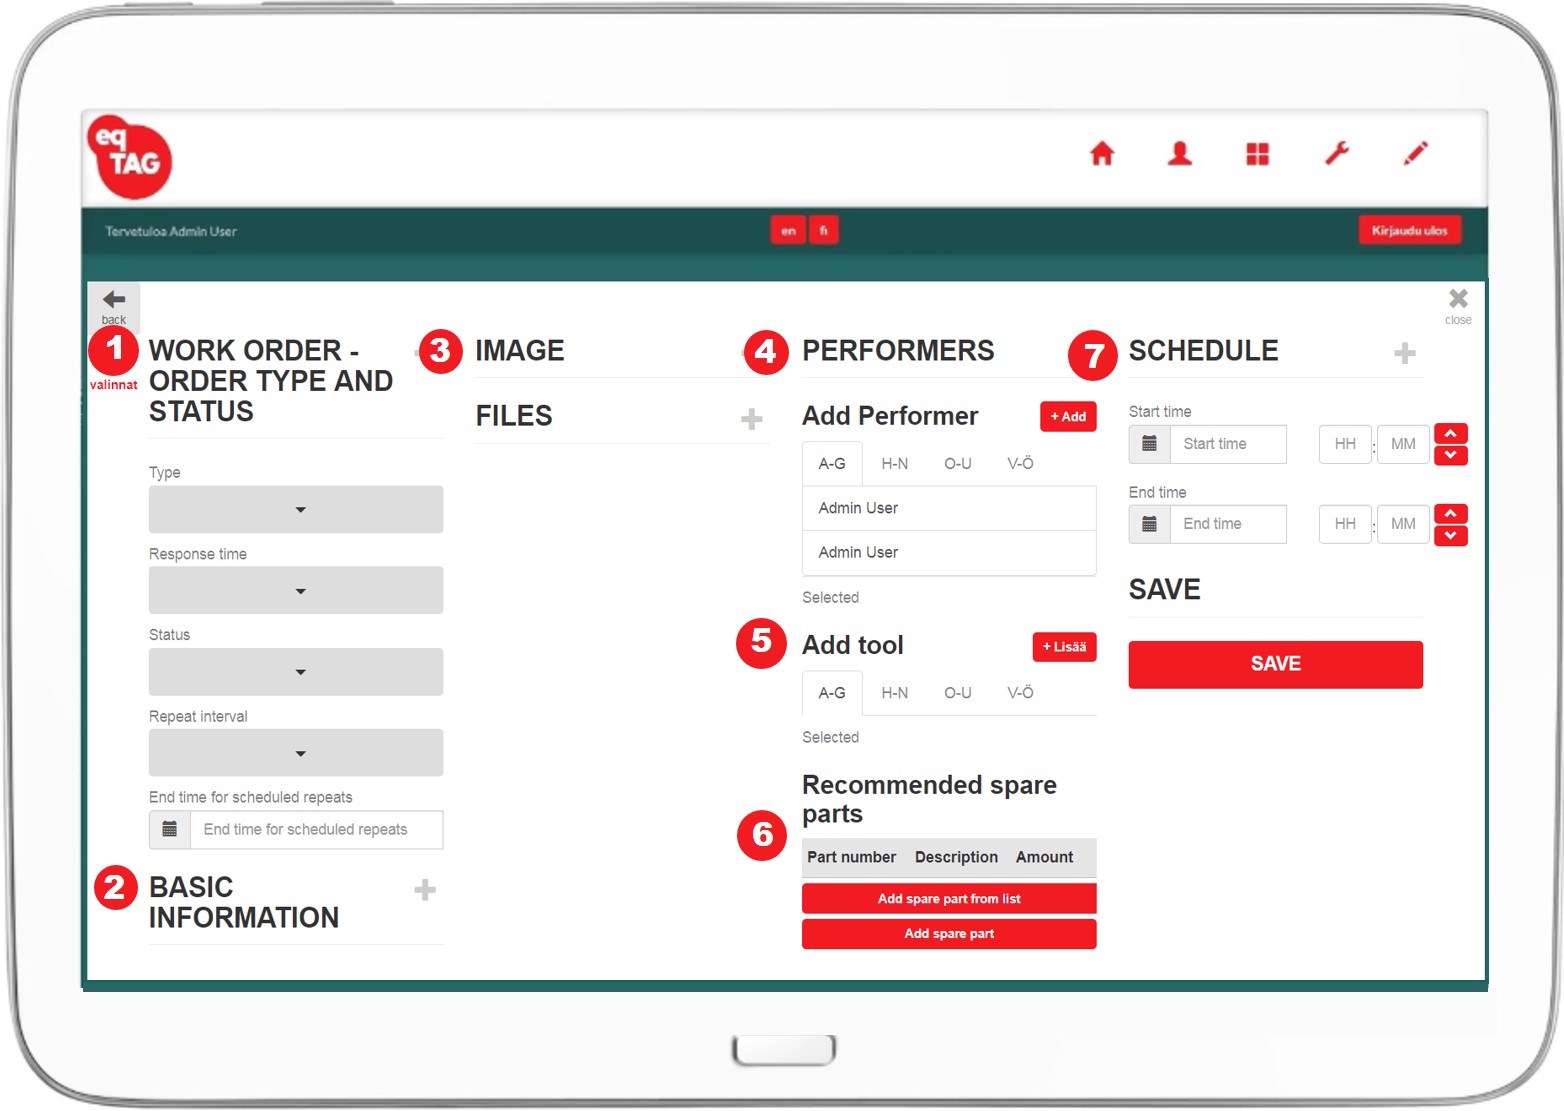
Create and schedule maintenance tasks with an efficient step by step workflow and manage scheduled work in one concise view. Service personnel receive the scheduled work orders in real time on their mobile devices. Rescheduling can be done by simplify dragging and dropping within a flexible calendar view.
- Fill in service task status, response time, status and choose one off or repeating work orders. If you repeat work you need to give the first task a work order date, scheduled date for the service, end date for the repeating work orders and the repeat interval.
- Pick the customer, orderer, customer site, contact person and equipment (to be maintained). Fill in the work description
- Add pictures and files
- Book / schedule the personnel
- Book the special tools & resources for the task
- Book the needed spares
- Schedule task
Note! Rescheduling can be done by simply dragging and dropping within a flexible calendar view.
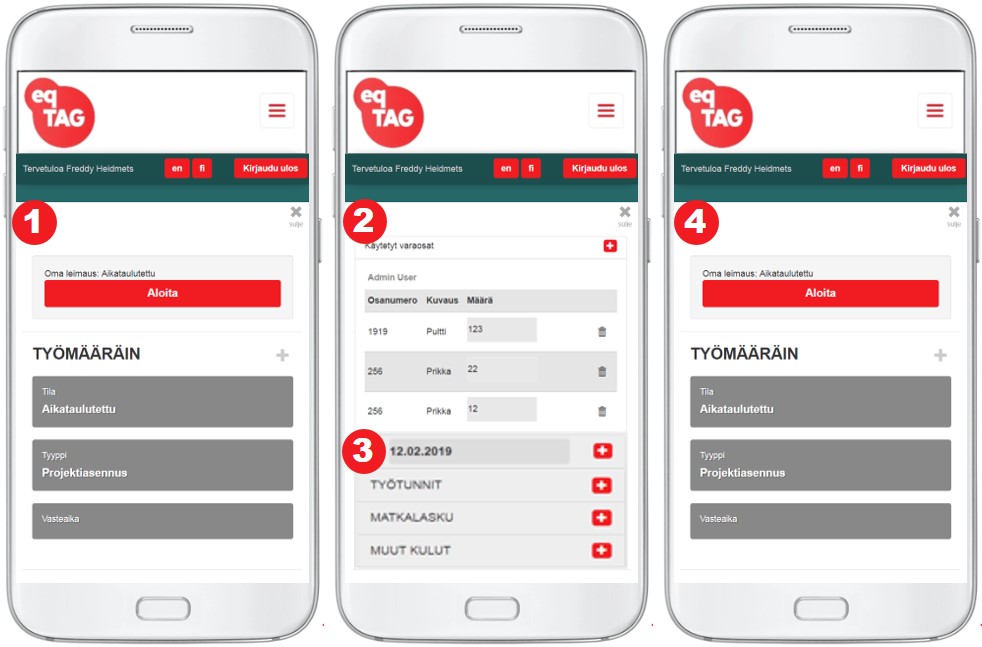
Field reporting
Service order reporting on mobile
Fill out reports for work orders as you work!
Just tap start on the work order. The work orders module intuitively guides the service technician intuitively in filling out a report for the work order. Just follow the steps to report working hours, used spare parts and a description for the service performed. Finally tap on finish and you’re done. The report is now ready and waiting to be attached to an invoice to be sent to the customer.
- Tap the button to start your work order.
- Fill in the used spare parts.
- Report your working hours, travel and other costs.
- Finally tap on Finish and you’re done.
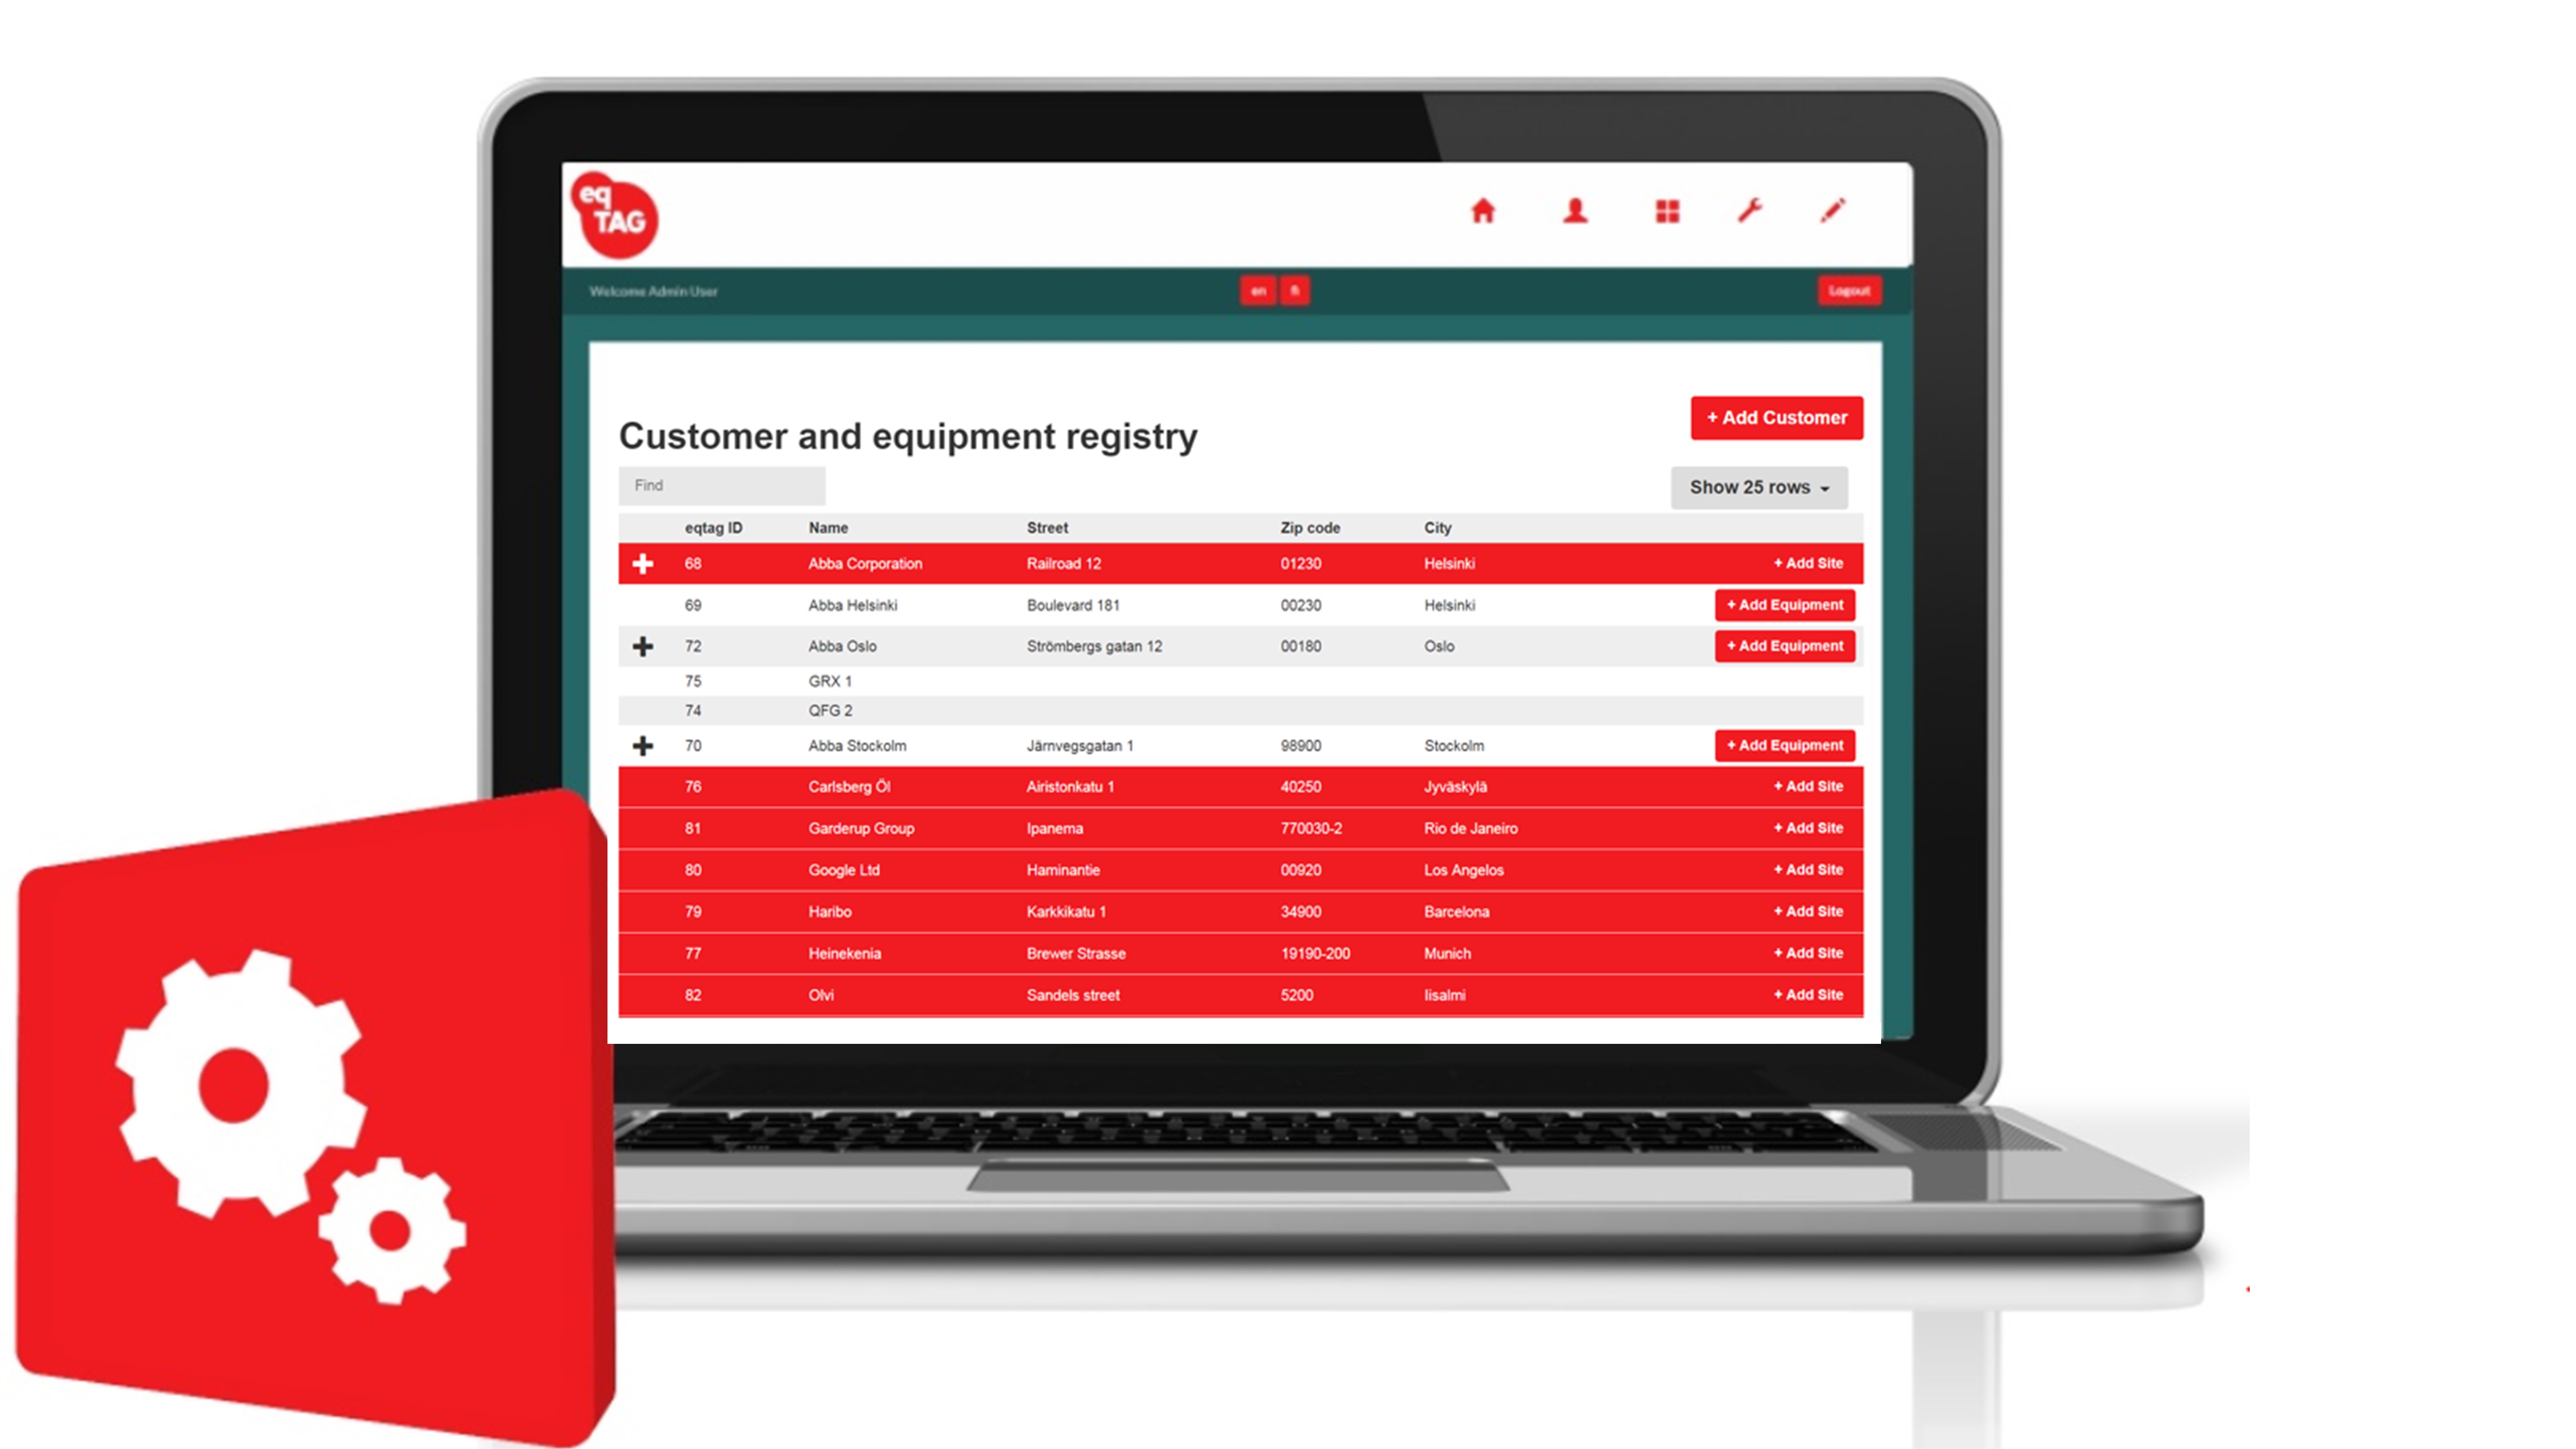
Customer and Equipment registry
Service “CRM” linked with Service management.
Customer registry is structured in parent child hierarchy. The eqTAG registry links customers to sites and sites to equipment. It is displayed in a tree map on the customer registry. If a parent or child is updated or deleted, the hierarchy is also updated.
Customer register allows system managers to do the following in the hierarchy:
- Create and manage customers and customer contacts.
- Create and manage sites and site contact personnel.
- Create and manage equipment information.
Note! Service management and work orders are linked with customer registry. You are always up to date on your service plan per customer and can track your service history .
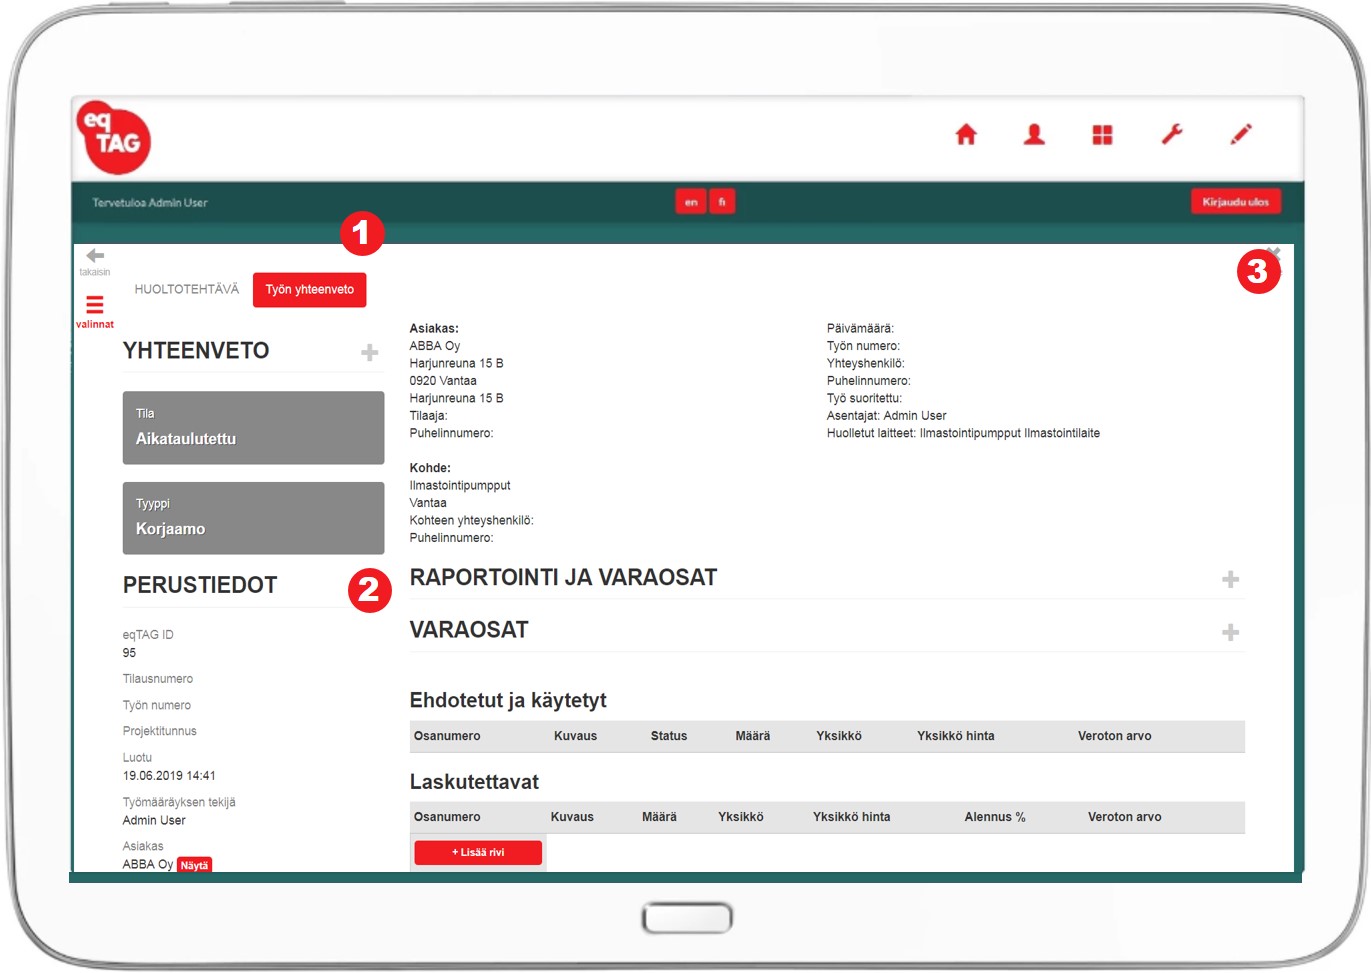
Customer report and Invoicing
Modify and approve work reports
Last check up before sending report to customer is required to make sure that all the order terms and conditions are met.
Your service process runs in eqTAG on three layers from inquiry to invoice.
- Service coordinator opens, schedules and manages work orders in the eqTAG Work management module
- Technician fills out reports instantly in the field from eqTAG work order module
- Final approval for the customer work report is done in eqTAG Work management module
- In the work management module choose work order and task summary page on it.
- Modify reported working hours, travel and other cost to actual billable values.
- Print the report and attach pdf file to your invoice. You can also include prices on the work report and use it as an invoice,
Note! All the works steps are saved separately into system. Afterwards it’s easy to track and follow up your planned task resources and spares to actuals and compare them with the invoice.
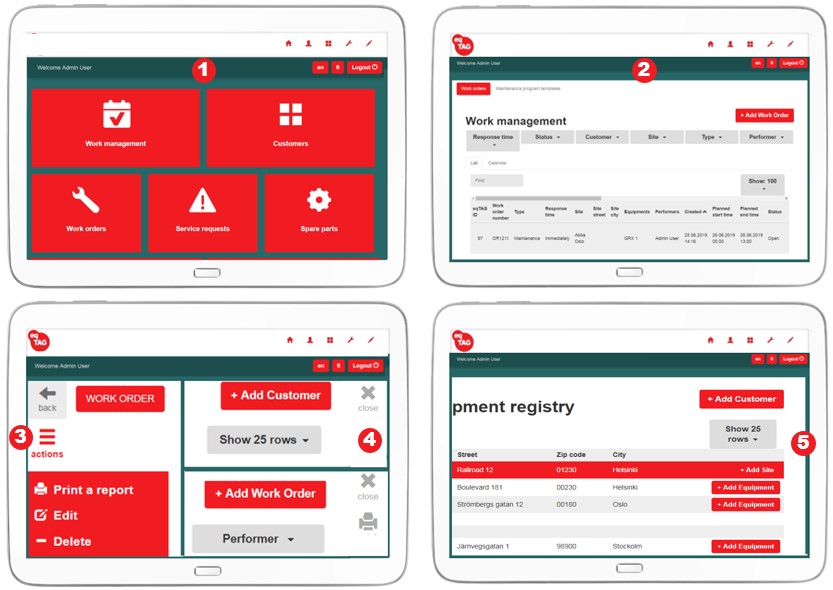
Features and user interface
Create new, edit, delete, close, print and list filters
All the system features are displayed on the first page. Features have own page views. In the page views, actions are under the buttons which are displayed on the upper left or upper right corner. User interface actions logic is the same in every system feature.
- System Features: Work management, Customer registry, Work orders, Notifications, Spares, Tools, Diary, User management, Settings and Tutorials.
- List view and filters.
- Action button in page view: Create new, edit, delete, print. Button is located always in the upper left corner on the page view.
- Close (page) and Print buttons in page view. Buttons are located in the upper right corner on the page views.
- Customer and equipment registry management. Add new Customer, Site or Equipment in the registry directly from the list view.
Note! Only part of the actions and buttons in the system are shown in the pictures as an example.